Divimera[R8]
Guide for girl's routes + Extras.
Warning:
If nothing is detailled for a certain day, that just means you don't
have to make a choice: you have just to keep playing and follow
the main quests to progress on the route without any inputs.
This step by step only offers the easiest way to proceed for the
girls, but there are several ways to achieve the same result,
sometimes with more interesting consequences.
For example:
Following the route of both Lady Hale and Charlotte can
trigger exclusive scenes of jealousy which will not appear if you
take the simpler route for one of these characters.
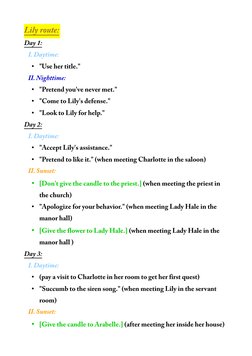
Lily route:
Day 1:
I. Daytime:
• "Use her title."
II. Nighttime:
• "Pretend you've never met."
• "Come to Lily's defense."
• "Look to Lily for help."
Day 2:
I. Daytime:
• "Accept Lily's assistance."
• "Pretend to like it." (when meeting Charlotte in the saloon)
II. Sunset:
• [Don't give the candle to the priest.] (when meeting the priest in
the church)
• "Apologize for your behavior." (when meeting Lady Hale in the
manor hall)
• [Give the flower to Lady Hale.] (when meeting Lady Hale in the
manor hall )
Day 3:
I. Daytime:
• (pay a visit to Charlotte in her room to get her first quest)
• "Succumb to the siren song." (when meeting Lily in the servant
room)
II. Sunset:
• [Give the candle to Arabelle.] (after meeting her inside her house)
• (pay a visit to Charlotte in her room to complete her first quest)
• (pay a visit to Hale on the third floor to complete her first quest)
III. Nighttime:
• "Ler her continue."
Day 4:
I. Nighttime:
• "Strongly decline the offer." [Normal scene] OR "Defer to Lady
Hale." [Submissive scene]
• "Lean in for a kiss."
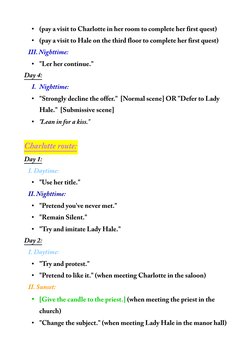
Charlotte route:
Day 1:
I. Daytime:
• "Use her title."
II. Nighttime:
• "Pretend you've never met."
• "Remain Silent."
• "Try and imitate Lady Hale."
Day 2:
I. Daytime:
• "Try and protest."
• "Pretend to like it." (when meeting Charlotte in the saloon)
II. Sunset:
• [Give the candle to the priest.] (when meeting the priest in the
church)
• "Change the subject." (when meeting Lady Hale in the manor hall)
• [Don't give the flower to Lady Hale.] (when meeting Lady Hale in
the manor hall )
Day 3:
I. Daytime:
• (pay a visit to Charlotte in her room to get her first quest)
• "Leave." (when meeting Lily in the servant room)
II. Sunset:
• (pay a visit to Charlotte in her room to complete her first quest)
Lady Hale route:
Day 1:
I. Daytime:
• "Speak casually."
II. Nighttime:
• "Be honest."
• "Remain Silent."
• "Look to Lily for help."
Day 2:
I. Daytime:
• "Try and protest."
• "Spit it out." (when meeting Charlotte in the saloon)
II. Sunset:
• [Give the candle to the priest.] (when meeting the priest in the
church)
• "Apologize for your behavior." (when meeting Lady Hale)
• [Give the flower to Lady Hale.] (when meeting Lady Hale in the
manor hall)
Day 3:
I. Daytime:
• "Leave." (when meeting Lily in the servant room)
II. Sunset:
• (pay a visit to Hale on the third floor to complete her first quest)
Day 4:
II. Nighttime:
• "Strongly decline the offer." [Normal scene] OR "Defer to Lady
Hale." [Submissive scene]
Arabelle route:
Day 1:
I. Daytime:
• "Speak casually."
II. Nighttime:
• "Be honest."
• "Remain Silent."
• "Try and imitate Lady Hale."
Day 2:
I. Daytime:
• "Try and protest."
• "Spit it out. " (when meeting Charlotte in the saloon)
II. Sunset:
• [Don't give the candle to the priest.] (when meeting the priest in
the church)
• "Change the subject." (when meeting Lady Hale in the manor hall)
• [Don't give the flower to Lady Hale.] (when meeting Lady Hale in
the manor hall)
Day 3:
I. Daytime:
• "Leave." (when meeting Lily in the servant room)
II. Sunset:
• [Give the candle to Arabelle.] (after meeting her inside her house)
III. Nighttime:
• "Ler her continue."
Day 4:
I. Nighttime:
• "Lean in for a kiss."
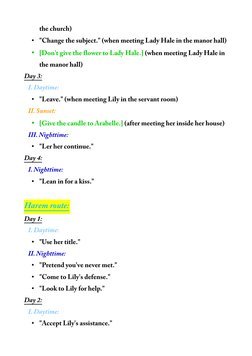
Harem route:
Day 1:
I. Daytime:
• "Use her title."
II. Nighttime:
• "Pretend you've never met."
• "Come to Lily's defense."
• "Look to Lily for help."
Day 2:
I. Daytime:
• "Accept Lily's assistance."
• "Pretend to like it." (when meeting Charlotte in the saloon)
II. Sunset:
• [Don't give the candle to the priest.] (when meeting the priest in
the church)
• "Apologize for your behavior." (when meeting Lady Hale in the
manor hall)
• [Give the flower to Lady Hale.] (when meeting Lady Hale in the
manor hall )
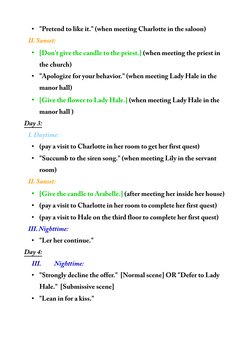
Day 3:
I. Daytime:
• (pay a visit to Charlotte in her room to get her first quest)
• "Succumb to the siren song." (when meeting Lily in the servant
room)
II. Sunset:
• [Give the candle to Arabelle.] (after meeting her inside her house)
• (pay a visit to Charlotte in her room to complete her first quest)
• (pay a visit to Hale on the third floor to complete her first quest)
III. Nighttime:
• "Ler her continue."
Day 4:
III. Nighttime:
• "Strongly decline the offer." [Normal scene] OR "Defer to Lady
Hale." [Submissive scene]
• "Lean in for a kiss."
• EXTRAS:
Molly:
– Pay her a visit inside the watermill on Day 1 and Day 2. Once you
get her quest: inside the manor, steal the wine from the locked
hatch and give it to her during daytime of Day 3 to get her scene,
before going to see Isaac corpse.
– Molly will disappear for a short while after being hunted down by
the priest's men. She will reappear in the slums area on Day 4 if you
did the wine quest. You will get a new quest from her: bring back
the hat located inside the watermill to get her second scene.
Riverside washerwoman:
– Talk to her on Day 3 to get her quest, on Day 4 you can bring her
back the hat which is located inside the watermill.
Doctor and the strange fruit quest:
– Make sure to take a look at the fruit on the table inside the Isaac
house after lighting the candles. This will make this quest possible.
– On Day 3 nighttime, after seeing the doctor argues with the priest
in front of the church, go visit the doctor in his office, you will get
the quest.
– On Day 4 nighttime, use the axe to break inside Isaac's house and
take the fruit, use the axe to kill the mutated rat, then bring back
the fruit to the doctor. Make sure to have at least 20 Sanity or you
will not be able to complete the quest because the rat will triggers a
game over when he takes out -20 sanity.
Ways to replenish your sanity:
– Trading the Vine Flowers (obtained at the cemetery location
through the gardener quest) or Angel's Trumpet (obtained through
trading the Vine Flowers to the gardener) with the doctor.
– Trading Mauritian Herbs (obtained by using the Botanical Book
in the manor's garden) or Rose Periwinkle (obtained by using the
Botanical Book at the crossing, the location that has the dead bear,
outside the wall).
Items for the tavern's gambling dice game:
Items that can be traded for tokens:
– The Wooden Cross (obtained from the priest if you gave him the
candle).
– Red Wine (obtained inside the manor's hatch through the first
Molly quest).
– Fancy Hat (obtained inside the watermill through the second
Molly quest or the riverside washerwoman quest).
First layer of reward:
– A pouch that grants one additionnal inventory slot.
– A botanical book that allows to identify and gather plants around
the island, that can be traded with the doctor in exchange of
concotions that raises your sanity.
– A strange looking egg shaped carving, that requires 4 stones to
open, use is unknown. The first stone that can be socketted into it
can be found by giving the strange bird located near the beach,
inside the hole of the big tree, some Bird Seeds from the parrot's
stash of seeds. He will puke and fly away upon use. If you have the
Odd Carving on you, you will be able to collect the first stone from
the pile of puke.
Parts of the game that can be tricky in their chronological order of apparition:
– Location of the "rope":